Brochures
"Print High Quality Brochures with fast and efficient turnarounds.
We add expert touch on your Brochures."
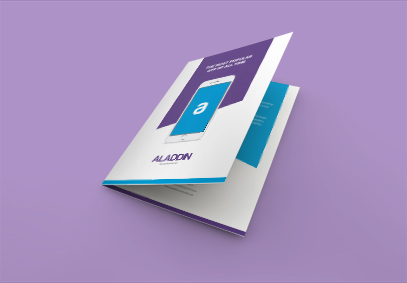
Brochures - Half fold
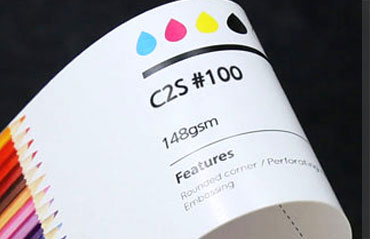
C2S100# 148gsm
- Improve to a higher quality stock
- high quality coated specialty paper
High Quality Brochures
 CMYK 4 colors
17" X 11"
Why ALADDIN Brochures?
Aladdinprintphil's Brochures are printed on high quality uncoated specialty paper. Brochures printed on our high-quality paper look impressive; connote style and elegance.
• Both-sided colors print (4/4)
• 17" X 11" (431.8mm X 279.4mm) available
C2S 100# 148gsm
A white C2S100# paper(coated two sides) stock especially suitable for Flyers, Brochures, Poster and Leaflets.
C2S paper is paper which has been coated by a compound or polymer to make paper easy to print and achieve high quality output.
Paper Weight:148 gsm, THICKNESS: 0.12 mm, Color: normal white
Matt 100# 148gsm
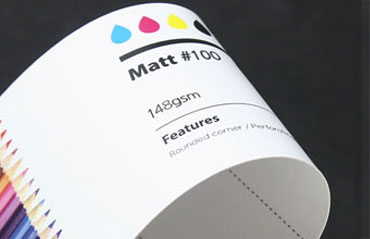
A white Matte100# economy bond stock especially suitable for Flyers, Brochures, Poster and Leaflets.
The matte white coating ensures that text is sharp and clear while photos and color graphics are bright with good contrast.
Paper Weight:148 gsm, THICKNESS: 0.14 mm, Color: normal white
Production Times
The production times listed apply - unless otherwise indicated upon receipt of your file completion (including confirmed printing data and payment) on working days before 10 am.
* Excluding shipping time
| Production Time |
|---|
| 5 - 7 working days |
| Working days are Monday through Saturday, excluding Sundays and Holidays. |
Document Size
| Trim Size | Bleed Size |
|---|---|
| 17.00" X 11.00" (431.8mm X 279.4mm) | 17.11" X 11.11" (434.6mm X 282.2mm) |
| Finished artwork should use the full bleed dimensions for best results. | |
Price Chart
| Stock | GSM | Color | 100 | 500 | 1,000 | 1,500 | 2,000 |
|---|---|---|---|---|---|---|---|
| C2S | 148gsm | 2-sides print | 6,265 | 17,500 | 21,525 | 25,463 | 29,400 |
| Matt | 148gsm | 2-sides print | 6,265 | 17,500 | 21,525 | 25,463 | 29,400 |
What are file requirements to upload - Brochures
How to prepare your files to order Brochures?
For best results, please follow our guidelines when you are uploading your own artwork.
Not following the any of these requirements would be the reasons why unexpected errors are occurring, and Aladdinprintphil.com has no responsibility for that.
1. ARTWORK DIMENSIONS
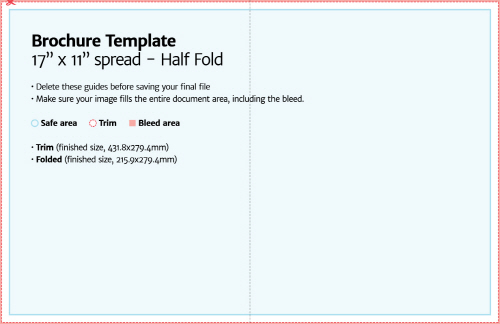
Please create a document size (bleed size) when you upload your file. To avoid file size errors, please download our templates.
Size requirement
Document Size (Bleed Size) - Blue line
17.00" X 11.00" / 431.8mm X 279.4mm / Resolution 300 dpi
Trim size (Final size after being cut) - Red line
17.11" X 11.11" / 434.6mm X 282.2mm / Resolution 300 dpi
2. BLEED SETUP
It is very difficult to print exactly to the edge of a sheet of paper/card, to achieve this it is necessary to print a slightly larger area than is needed and then trim the paper/card down to the required finished size. Images, background images and fills which are intended to extend to the edge of the page must be extended beyond the trim line to give a bleed.
Bleeds to order our Brochures basically are 1mm on each side from where the cut is to be made.
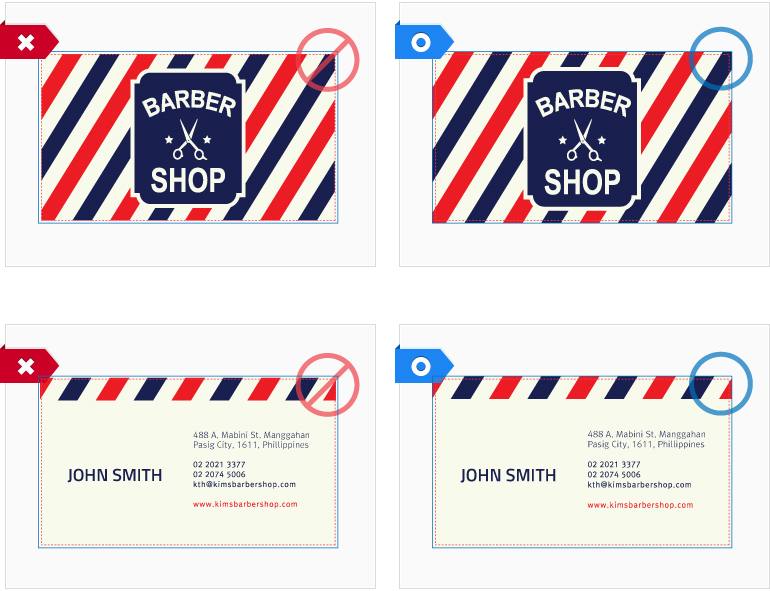
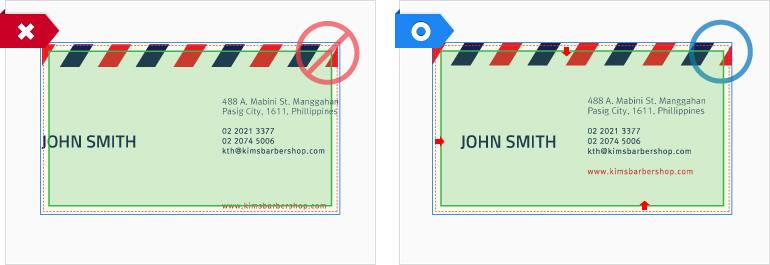
3. SAFE AREA
You will want to make sure all text and graphics that are not intended to be cut off are within the safe zone. The safe zone is an area that is a safe distance away from the trim line where the cut will take place. Text and graphics within the safe zone are guaranteed to not be cut off.
Text and graphics should be at least 1.5 mm on each side from the trim line(cut line).
Safe zone
Safe Area (Text & Graphic safe zone) - Green line ( )
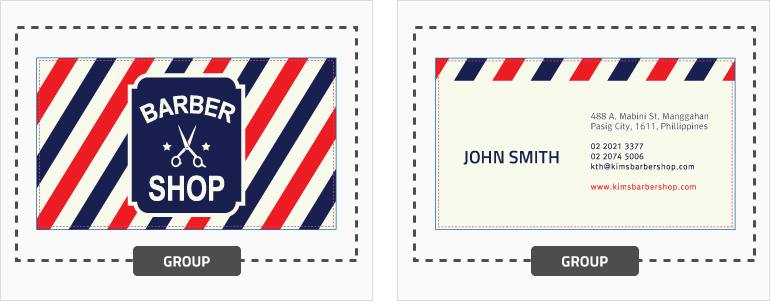
4. GROUP
Make your artworks front and back each group.
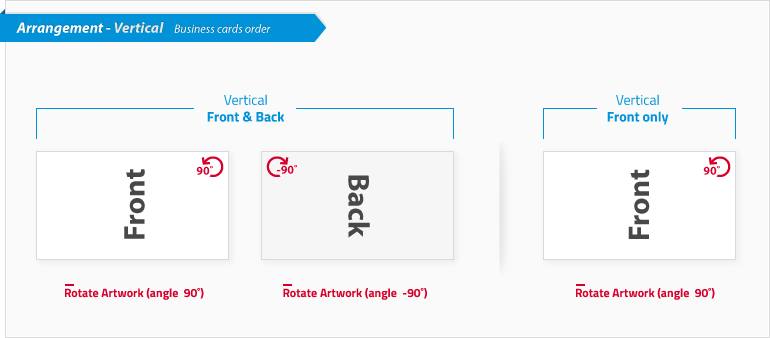
5. ARTWORK ARRANGEMENT
You should arrange your artworks front and back in one file like below.
Horizontal
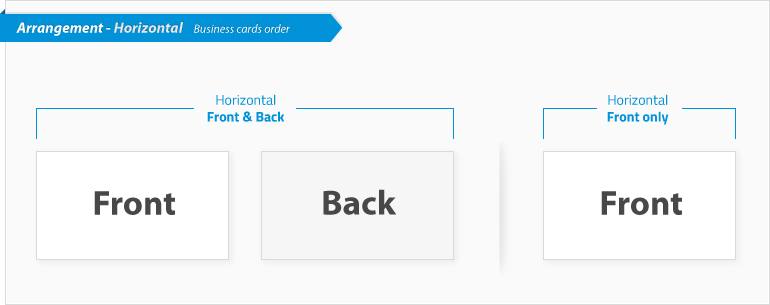
Vertical
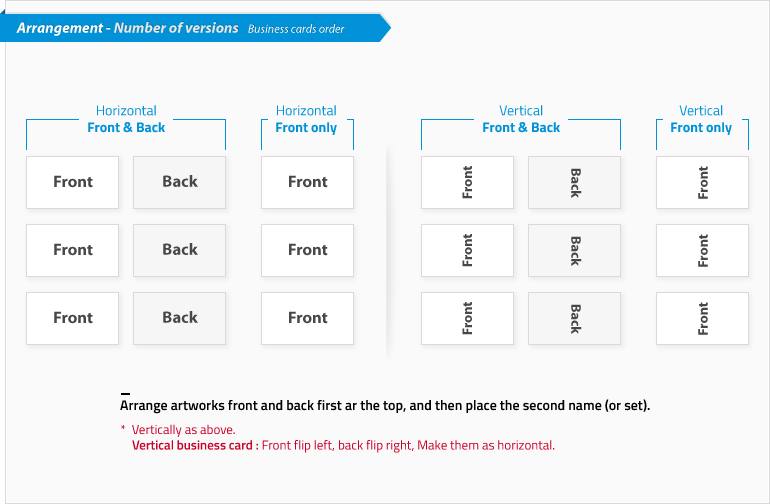
6. Number of versions
Versions(sets) are items that the same specifications(size, etc), just different artwork
- eg) Brochures for 20 different people.
How to Create a print-ready file
The following instructions will help you create a print-ready file. If after reading them you are still unsure about anything, please visit to get more informations the Artwork Guides section of our website, request a professional File Check or contact customer services at aladdinprintphil@gmail.com
1. FILE FORMATS
Your file these formats in 1:1 scale (not password protected).
2. COLORS (CMYK VS RGB)
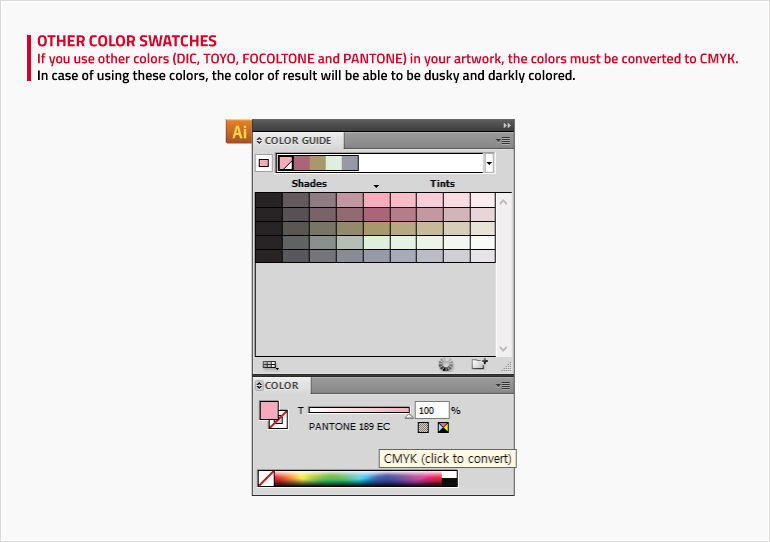
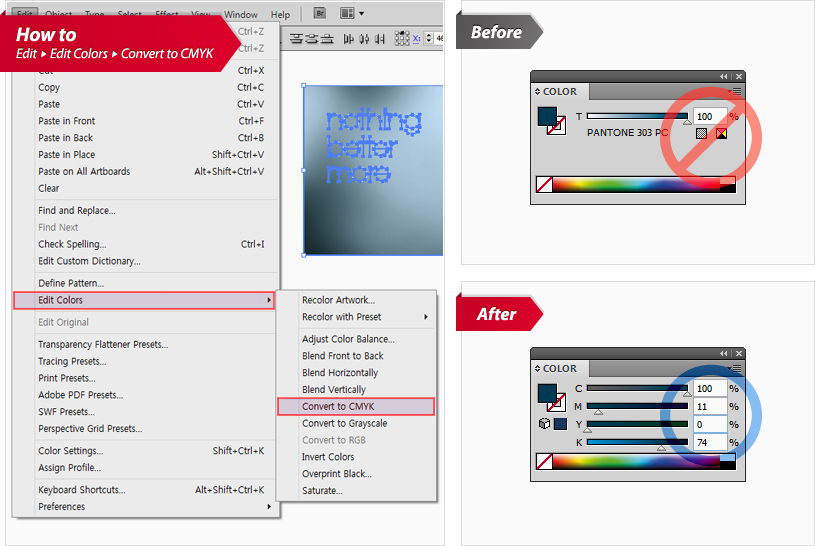
All files must be created in CMYK (cyan, magenta, yellow and black). Images in RGB or in PANTONE colors which must be converted to CMYK.
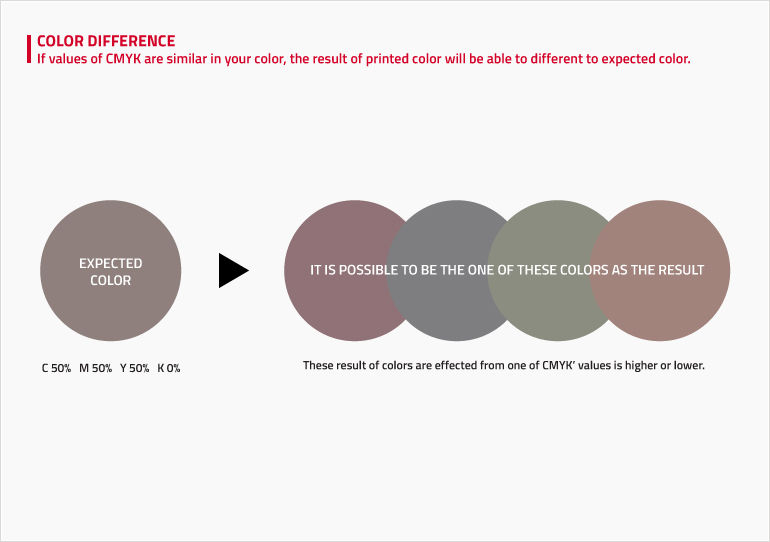
Aladdinprintphil does not guarantee color will match the preview on customer's monitor, as we cannot compensate for the color variance on each customer's monitor set-up.
The color you see in your monitor is in RGB Color scheme which consists of three colors; Red, Green and Blue. These are the primary colors of light, which computer monitors use to display images on your screen.
The color to be printed on your business card is in CMYK color scheme, which consists of four colors: Cyan, Magenta, Yellow and Black. In full-color process printing, CMYK is the standard method of offset printing.
Therefore, the printed color will never perfectly match the on-screen color. Colors vary from monitor to monitor, and different printers produce different color results.
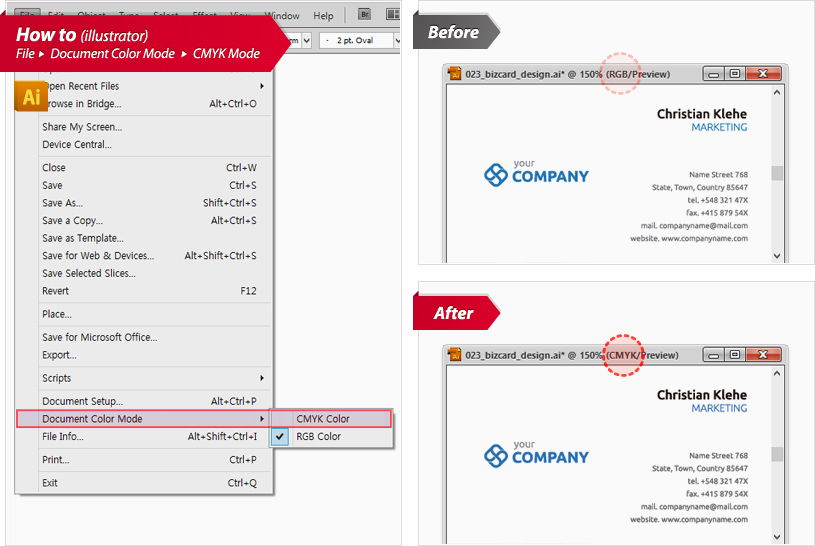
Adobe Illustrator
A. Go to the File Menu and choose "Document Color Mode"
B. check mark will appear next to current color mode.
C. Select CMYK Color
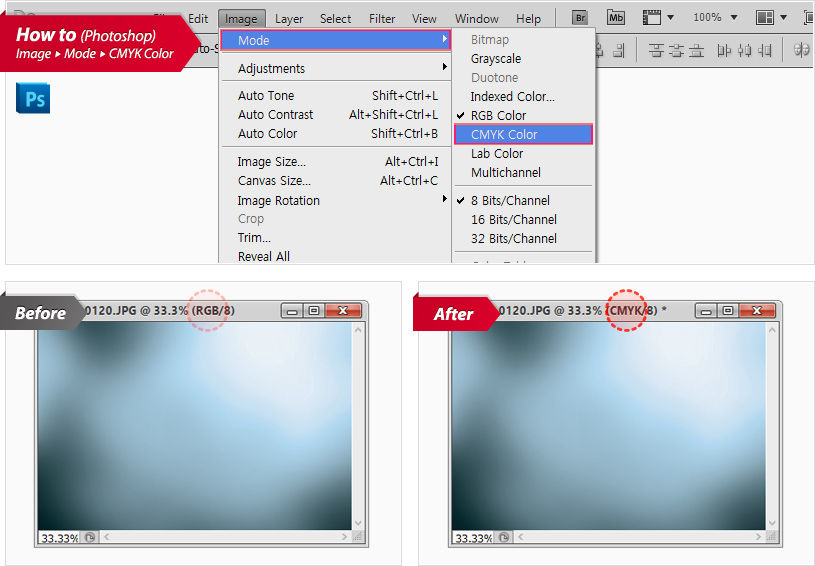
Adobe Photoshop
A. Go to the Image Menu and choose "Color Mode"
B. A check mark will appear next to current color mode
C. Select CMYK Color
3. RESOLUTION
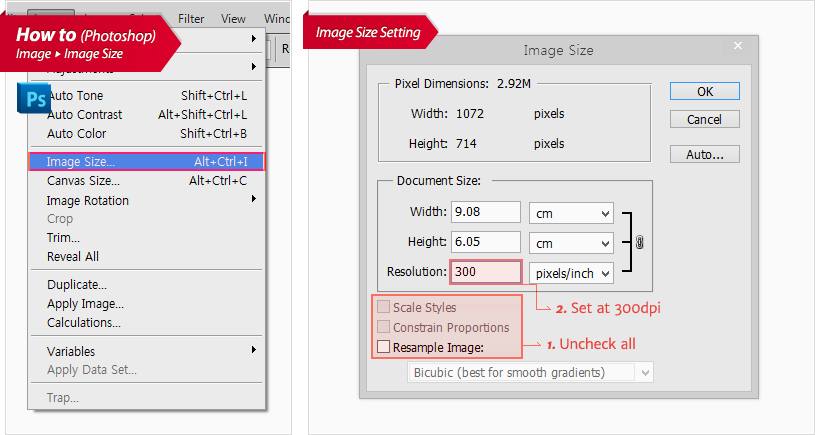
The optimal resolution for the print files is 300 dpi.
Please note that if your image or text is a lower dpi, converting it in a design program to 300 dpi won't actually increase the resolution, you will want to make sure that the actual image or graphic was originally created at 300 dpi.
4. FONTS AND PATHS
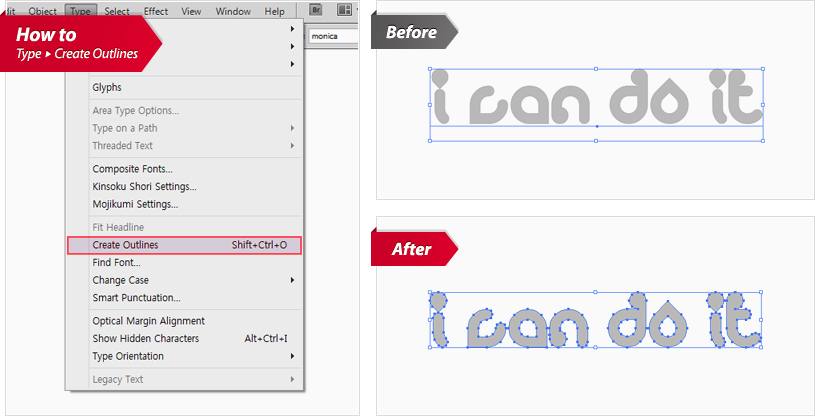
Fonts should be embedded into the PDF or converted into curves/paths. The minimum font size (below which we cannot guarantee perfect print quality) is 6 pt. The minimum printable line weight is 0.25 pt.
How to Convert fonts to outlines in Adobe Illustrator
A. Select all the text (Control + A)
B. Click Type Menu > Type > Create Outlines
C. Text now has a outline
5. MARGINS AND BLEED
Download the template from the website: the required bleed of 2 mm on each side will already be correctly set up. Text should be at least 3 mm from the cut line.
6. EFFECT
Effects for gradient, transparency and shadow must be converted rasterize or bitmap.
How to Convert rasterize in Adobe Illustrator
A. Select the Object in an effect
B. Click Type Object > Rasterize
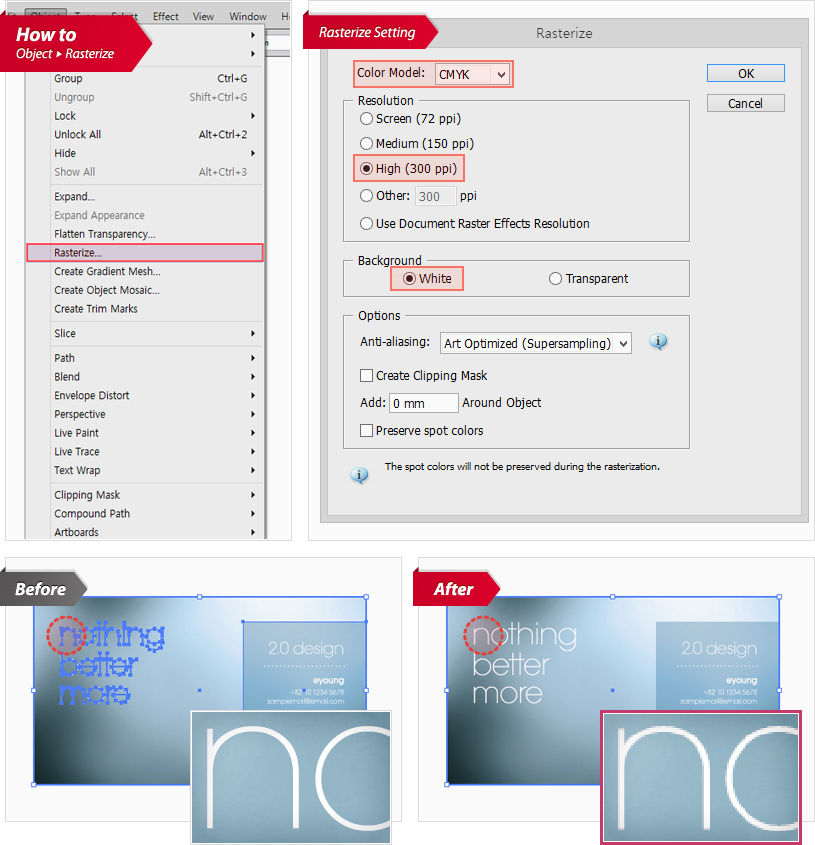
1. Choose CMYK in the Color Model
2. Select the High (300 ppi) option in the Resolution section
3. Select the White option in the Background section
7. SPOT COLORS
Most designers like to work with spot colors. But in many cases, these artworks need to be printed using CMYK inks, an extra "dedicated" ink for the spot color is more expensive.
8. DEEP BLACK
Every company has their own recipe for a nice black. But a black that carries too much ink can be a problem for some printing methods. A black that's too heavy can cause web breaks on a web press and marking or set off.

9. REGISTRATION & CROP MARKS
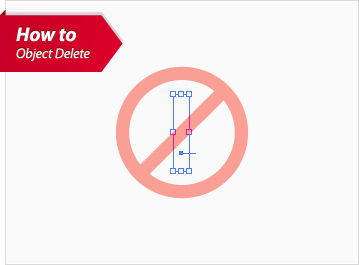
You must delete all unnecessary guidelines / crop marks / registration marks / empty font object.
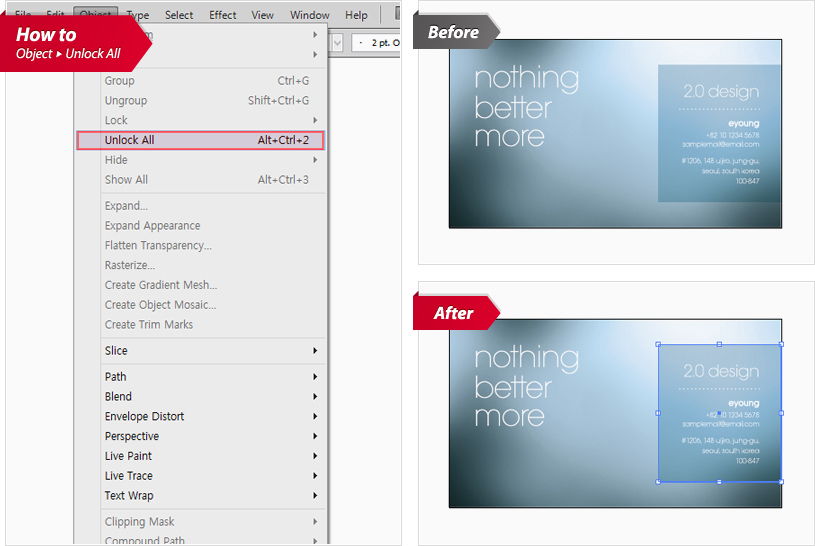
10. LOCKED OBJECTS
You must unlock all objects.
How to unlock the objects
Click Object > Unlock All
Download our template - Brochures
Brochures Template
To avoid file size errors, please download our templates.

Turnaround Time - Brochures
Turnaround time is the processing time that the product you ordered takes until it is completely manufactured.
There are 1-2 shipping days for you to receive your product finally.
1. TURNAROUND SCHEDULE
This turnaround schedule is not for guaranteed shipping. The shipping can be delay some conditions.
-

DAY 1
FILE COMPLETION
When you make a payment for your order, we will check your file (artwork).
After conformed the file which will be in our progress to work for your order.
-

DAY 2
PRINTING PROGRESS
Basically it takes a day to process for printing, after confirmed your order.
It is possible a day to delay due to a number of works we have or finishing options.
-

DAY 4-5
CUTTING & FINISHING
Last process to complete the work, it need to be take a day for cutting procedure.
It is possible a day to delay due to a number of works.
-

DAY 5-7
LOCAL DELIVERY
After checking your product, we will send your product immediately.
It can be take more time depending on your area.
-

NOTICE FOR DELIVERY
Only Metro Manila and some areas of Luzon will be delivered your product on next day from a date of sending.
We can deliver your order anywhere in the Philippines.
PLEASE NOTE:
Working days are Monday thru Saturday, excluding Sundays and Holidays.
2. PRINTING PROCESS
-

Choose
your product -

Upload
your Design -
Pay for
your product -
Proceed
Printing -

Send
your product
3. SHIPPING INFORMATIONS
PICK-UP Informations

488 A. Mabini St., Manggahan, 1611 , Pasig City, Philippines
(T. 646-9810 F. 646-9913)
Direction
- If coming from Ortigas, take Ortigas Ave. going to Cainta take Rosario going to Ligaya
- If coming from Marcos Highway, take A. Rodriquez Ave. going to Pasig
- The landmark nearest is the Central Business Park
- The street right after to Central Business Park is A. Mabini St.,
- Then go straight ahead to A. Mabini, look for the big green gate of Trojan Forms factory.
3 WAY how you get your Products.
A. Pick up at Pasig office
B. Assigned pick-up place
C. Delivery


